Showing posts with label PlanB. Show all posts

Sunday, October 5, 2008

Miniwave, Majorpain


SO... it's been a while, yes?

I would usually preface this with an apology for the lack of posts in the last 30 some odd days but that's not what you're here to see. You want the good stuff.

With that, I give you Miniwaves of Majorpain: One Man's Odyssey Into Making The Unfit-able... Fit.

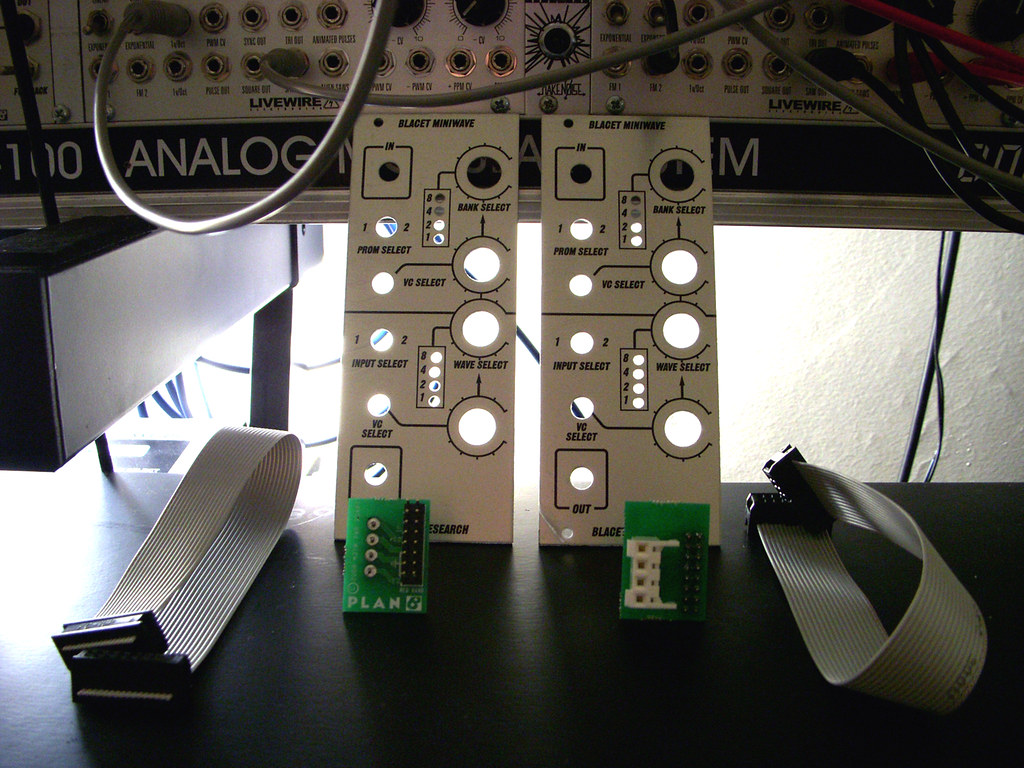
We start with two PlanB Miniwave faceplate euro kits. They come with a handy, dandy warning letting us gentle folk know that the kits will not allow for the Miniwaves to fit into the confines of the Doepfer portable or monster case systems naturally due to the minwaves inherent depth while only letting them fit between bus board connectors in the more standard G6 cases.

Bullocks, rubbish, nonsense, you don't tell me what to do.

So with those words in mind, I set out to do just that.

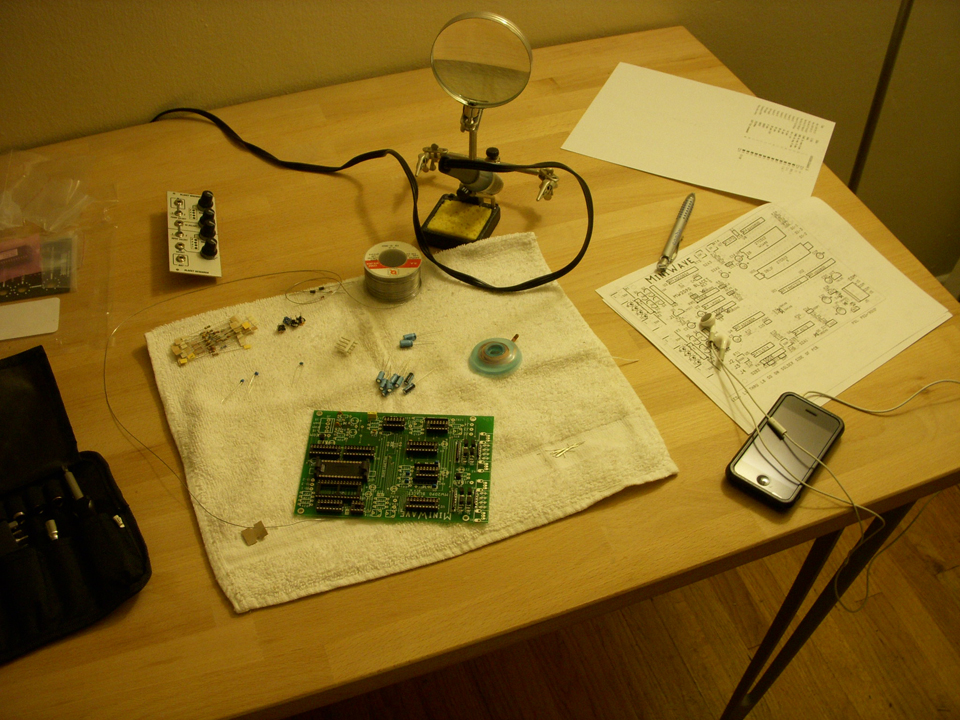
I'd like to point out that this was the first module kit I've ever put together from start to finish. My only other experience being with soldering of the wiring of jacks to the PCB of a Blacet Time Machine about four or five years ago that a dear friend of mine built 98% prior to my "work." In other words my skills with the iron were less than satisfactory. But that didn't stop me, for now I had time on my side, patience as my virtue & a metric shit-ton of ignorant bravado.

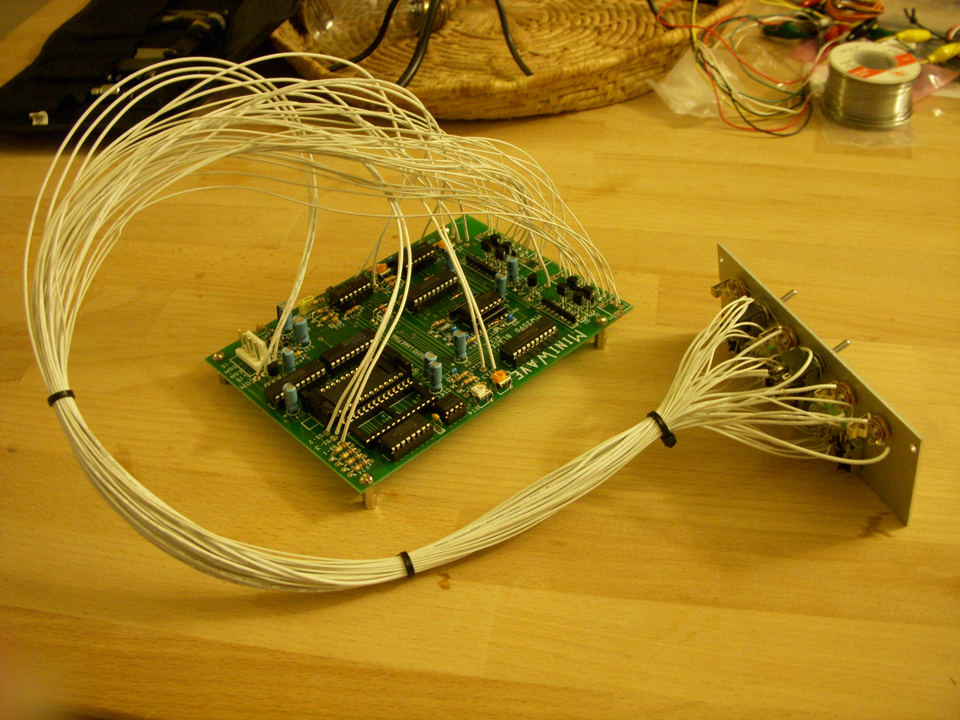
I laid out a course of action to finish the task at hand without feeling overwhelmed. I spaced out the work in 90 minute chunks over the span of five days, those being Monday through Friday. Although I'm sorry to say Wednesday was thrown out the window not do to my lack of caring, but more for my lack of consciousness. Thursday was the utmost frustrating & feverishly conducive towards me hitting fragile things with heavy, blunt objects. In aforementioned "fourth day" It was time for the point to point soldering of all the faceplate components via wires to the PCB. Thats 43 wires, 86 patch points. Now it wasn't so bad until it came down to the LED & Potentiometer prongs. I've not been as agitated or so easily angled towards rage in any point in my life, I'm pretty sure.


(As a side note, the LEDs are designed to be held in place by only the holes holding them to the PCB. They are purposely angled so they stay seated into the faceplate in that arrangement. Well... not so with how I needed to attach them. Instead I had to buy a hot glue gun and make like I was practicing for my money-shot moment. But I have to admit, it held them in place perfectly.)

And now its done, right?

Not without the proverbial hiccup mind you. (please, READ the instructions thoroughly. Don't skip over the jack solder assignment just because you're looking at the picture and holding your PlanB faceplate in your hand. Nice little tip, the jacks aren't in the same order top to bottom as on the Blacet faceplate. This was entirely my fault and not the fault of anyone else.) I'd like to give a thanks to Gur from Tiptop Audio for having the kindness in his heart to read the schematic for me (did I mention how bad I suck?) and showing my error.

Then there was the problem of how to get the PCB into the case. I knew I had to rest it @ the bottom of the case and while doing so I wanted to install stand offs to lift it from the floor of the unit. FAIL. You can't get the PCB in that position with stand offs installed except by maybe removing the bus board first. (No thank you.) So I chose to insulate any metal in that section of the case that could possibly touch the pcb via electrical tape for now until I devise a proper, long term solution.

Lastly, while installing the PCB you must disconnect the power adapter PlanB provides due again to it not being able to fit in its location otherwise. After it's secure your all done.


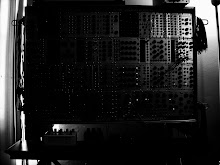
So here it is, in all its defiant glory. A Blacet Miniwave humming quite happily inside a Doepfer Monster Case.

Here is a link to all the pictures I took over those 5 days.

Now forge on you rebels and install one (or more) of your own!

I know I will be.


Saturday, August 30, 2008

Plan B Blacet Miniwave Euro Kits


Just got back from Noisebug with the two kits I ordered.

They come with the bare faceplate, the power adapter & a power cable.

The units are 10hp & even have the protective plastic still attached for those (like myself) who won't be installing them right away. Its gonna be a little more work to squeeze them into the monster case than just replacing the faceplate.

Fun.


Tuesday, August 26, 2008

Gnomes are not Elves


Took in two Plan B M-37 ELF LFO's this weekend.

I have to admit I was a tad skeptical during the procurement. In swapping out my trusty Doepfer A-145's "what will I do without my sine and inverted saw outputs?" crossed my mind. And then reason kicked in, thats what slew limiters and inverters are for, buddy.

These are definitely the widest ranged LFOs I've had experience with so far. (I don't get much time to use any Serge panels around these here parts) But what surprised me the most was its functionality as a sparse but more than adequate oscillator, just twist the attenuation knob for the VC Freq fully clockwise for the input to track at 1v/o.  Lets take that one step further and say as an oscillator synced to another oscillator, even another M-37 for all intensive purposes. 

Anyone wishing to add an additional oscillator but are hesitant or restricted due to price and/or your personal modular real estate should consider these units as viable options.


I didn't take the time to tune properly but I'm sure you get the gist of things from that.

Oh, by the way Peter. Thats a Gnome on your site, not an Elf. ;) 

Keep up the good work, incorrectly classified fictional humanoid races and all. Because if thats all I have to complain about thats more than fine by me.


Monday, June 23, 2008

Make Noise, Will Travel


Gonna keep is short and sweet, no filler this time.

I've had a
MakeNoise Moddemod for the past few weeks now & Its been an amazing little module.

It had three things going for it before I even unwrapped it from its packaging...

1) takes up very little space.
2) requires no power from the case.
3) looks like my 5yr. old nephew designed the panel graphics (I find it a plus, ok?)

I have yet to see a picture of the actual circuit board and components around the interwebs so I thought I'd offer one up for those of you that are curious.

There are plenty of audio examples and even a video on the MakeNoise website so I won't waste time uploading redundancy.mp3 vol2. I will however share my thoughts on the signal level from the outputs of the Moddemod & there in lies my only complaint (as meager as it is) about the unit.

I had to route the output into a PlanB Model-9 mixer to boost the signal to match the rest of my modules. There are so few components on this little guy I'm sure its not a flaw in my module, just the nature of the beast. If this is the only pain I have to endure then so be it, i'm good with that.


I also took a closer picture of their snazzy catch phrase which was placed between the two middle transformers for all us curious (ie: social life nonexistent) circuit board easter egg scavengers.


In closing I really must recommend this module to any and all fans of ringmodulation. Its a unique addition to an already growing group of module makers. As of this very moment Analogue Haven has them in stock, but for how long is anyones guess. So go snag one yourself, you will not be disappointed.


Friday, May 16, 2008

Resonance instability = fun


I was fiddling with the polivoks vcf's resonance this evening and came about a startling setting. Something I can only describe as a sustaining vinyl needle slip.

The only modules in this set up (as shown to the right) are a Livewire Dual Cyclotron -> PlanB Model-15. the Model-15 pulse out -> Polivoks vcf -> Model-13 set fully open (vca-only setting).

The polivoks settings are static, no modulation inserted into the unit of any kind. The input attenuation is at about 60%. Luckily (or not, depending on your opinion) I'd been recording the patch. I brought the cutoff down slowly, once the "needle scratch" is sustained I touched nothing else. The circuit eventually stopped and restarted the oscillation on its own.

It doesn't sound pretty, thats for sure. but we likes it.


Thursday, May 8, 2008

Slacking on the other half.


I've been busy this week and haven't had time to write the second half of the review for the Clockwork, but I will get to it, soon.

In its stead I have uploaded a short mp3 of a very bland patch that shows how the 3 seperate gate/clock outputs could be used to fire off individual envelopes in a patch. the summed CV/LFO is routed to the 1v/oct input of a Plan B Model-15. the rest of the patch can be seen here. Nothing fancy, just random division assignments that the Clockwork puts into play every downbeat.


I amost forgot, I wouldn't have the opportunity to make this review had Shawn @ Analogue Haven not told me about it. I'd recommend anyone interested in something like this to shoot either Shawn or Andrew over there an email. Good guys those two.

Monday, May 5, 2008

FLAME Clockwork... the first 10 minutes.


ok, so I just de-boxed this guy around 3:00am and have only spent about 15 minutes with it. not nearly long enough for a justified opinion on the whole. BUT, I will say a few things. 1) I plan on a more in-depth post after I get better acquainted with the bugger. 2) It was easy to understand right out of the box without much mucking about with what little manual (more like a one page pamphlet) that comes with the unit. & 3) I'll open her up and see what kind of build quality we are dealing with.

so, until then here is a short little sample of what the patch above sounds like.


Tuesday, April 22, 2008

first post, here goes...

With all the synth related blogs out there why in the hell did I possibly think "hey, one more won't hurt" ?

But seeing as this will likely be lost in the background noise, probably predestined to meander along with the rest of the floating "oh hey, I don't update enough" blogs that clutter the inter-webs I'll not lose sleep over it if that is indeed the case.  

"..so for my first trick" I'll just post a self generating patch I made this evening. nothing fancy or impressive really, mainly something for the overly-eager-to-post commenter to either shift the voltage negative or positive (yes, I'm afriad I really went there.)


your future mockery will be most appreciated.